Now that you’ve installed Tudat, you can run all of the example applications and unit tests at your leisure. On this page, we will describe how to create other Tudat applications, specifically tuned to your research/education project. There are two broad options for creating applications: pulling an existing application from Github (or elsewhere), or creating an application from scratch. Below, both are discussed.
Git is included in the default packages of Anaconda (>python 3.7). Mac and Linux users can use the default terminal for Git commands. Windows users should use the Anaconda prompt for Git commands.
Note
It is not the goal of this page to give a full-fledged introduction to repository management, git or Github. Much more details can be found online, for instance in the Resources to learn Git or Github Help. An extensive online book on git is given here This page is meant to serve as a starting point for using git with Tudat and using examples that are very close to a typical user’s first Tudat experience.
Below, we discuss how to retrieve an application from an existing Github repository, how to retrieve any updates that may come available after you’ve downloaded it, and how to send the code to your own Github account. As an example, we will use the NumericalAstrodynamicsAssignments_2023 repository. Depending on whether your repository is to be public or private, follow Step 1a, or Step 1b.
Warning
IMPORTANT! When setting up a repository for use in the AE4866 or AE4868 courses, it is required to set the repository to private (and follow step 1b, not 1a).
Step 1a (for a public repository): Fork the code on Github
The first step in the workflow of retrieving a public application is to “fork” it. Forking means that you will create a copy on your own Github page, which is identical to the original. The reason why we do this is that, typically, you will not have permission to modify the original repository, and have to save any modifications you make under your own account. To do so, first make sure you are logged into Github, and then go the repository page for the application you want to retrieve, and click the “fork” button at the top (see screenshot below).
After doing so, you will have created your own local version of the NumericalAstrodynamicsAssignments_2023 repository.
Step 1b (for a private repository): Import the code on Github
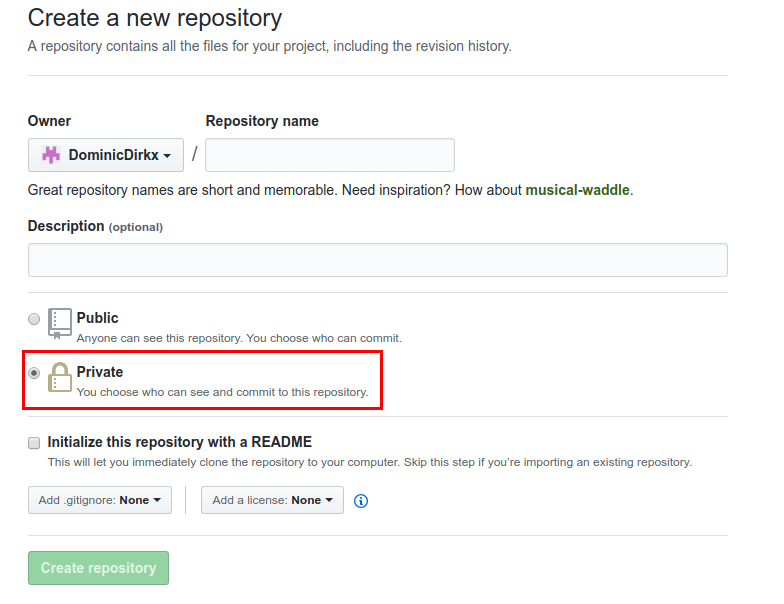
The first step in the workflow of retrieving a private application is create an empty new Repository, by going to https://github.com/YourName (fill in your own name), and clicking New under Repositories (see screenshot below):
Type a name for your repository (make sure it is descriptive, so not NumAstroAssignment, but, for instance, NumericalAstrodynamics2020_INSERT_NAME), and set the repository to private (see screenshot below).
You may, but need not, write a repository description. Click Createrepository.
On the bottom of page you are redirected to, click ImportCode. Fill in the name of the repository from which you want to retrieve code (for instance https://github.com/Tudat/NumericalAstrodynamicsAssignments_2023), and click BeginImport. Once the import is successfully completed, you will receive an e-mail, with a link to your new, private, repository.
For a private repository, you can control who can view/modify your repository. To add other users to your repository, go to the Settings/Collaborators of the repository, and add other users that you want to invite.
Warning
IMPORTANT! When setting up a repository for use in the AE4866 or AE4868 courses, invite @dominicdirkx and @transferorbit. For these courses, it is prohibited to invite your fellow students to a private repository for an individual assignment.
Step 2: Clone the application to your system
Now, the next step is to create a version of the code on your computer, which is linked to your own Github page. Using the terminal (or the anacondaprompt program when using Windows), navigate to the directory where you want to have your assignment code. Then, use the following command in the terminal:
Now, we are ready to discuss two distinct but related aspects of developing your code:
Retrieving modifications from the original repository, called pulling (here: https://github.com/tudat/NumericalAstrodynamicsAssignments_2023.git)
Uploading your modifications to your own repository, called pushing (here: https://github.com/YourName/NumericalAstrodynamicsAssignments_2023.git).
In your terminal, first navigate into the directory containing your git repository ...../NumericalAstrodynamicsAssignments_2023/)
Step 1: Setting up your remotes
In git, a remote is an address of an external repository (in this case on Github). You can set any number of remotes you like for a given repository. You can view all your remotes for a given Git repository by using the
gitremote-v
command in your terminal. Running this command will likely result in the output (for now, forget about the distinction between pull and fetch):
Typically, you will have two: an origin and an upstream, which is also the convention we’ll stick to here. The origin remote is the one from where you’ve cloned the repository, in this case your own Github version of the NumericalAstrodynamicsAssignments_2023 repository. This remote will have been set automatically when cloning the code. With the way the repository is set up, you are ready to update your own Github version of NumericalAstrodynamicsAssignments_2023. To also retrieve new code from the original tudat repository, we need to add an additional remote, the upstream. To do so, use the following terminal command:
If you forget to do so, you will encounter the following error message when trying to commit your code (see next step), asking you to enter the two lines of code above:
Before you can push changes to your Github account, you must first commit (save) these changes locally on your computer. A commit provides a snapshot of the current version of the code, to which you can return at later points in time.
Tip
When finishing a part of the code to your own satisfaction, or making clear progress in your work, commit your code. This does not override any old or later commits, but will provide a way to go back to your current version of the code.
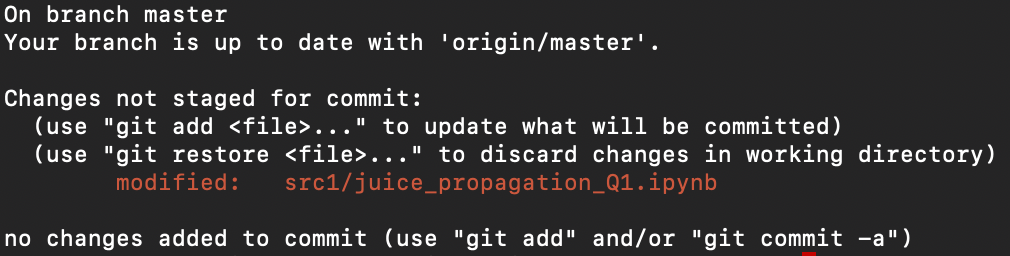
The first step in making commits is usually to check what has changed w.r.t. the previous commit. To check this, type the command:
gitstatus
This should given an output similar to that given below:
In this example, we have modified two existing files, and created a new file.
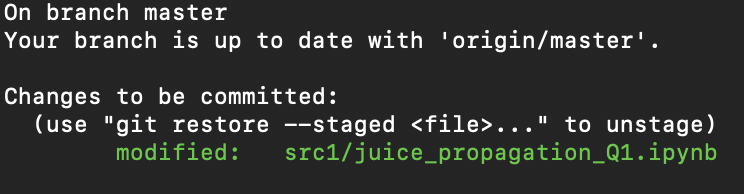
Now, before committing, you must stage changes for commit. To stage all changes shown by the gitstatus command for commit, use:
gitadd.
For the example given above, this will result in (after running gitstatus again):
If you only want to stage a single file, or folder, use:
gitaddFolderName/gitaddFileName.ext
where .ext is just an arbitrarily chosen extension. You can also use:
gitaddFolderName/FileName.ext
to stage a single file in a folder. You can combine as many gitadd commands as you like to stage all your files for commit.
Now, committing your code is done by:
gitcommit-m"Your commit text here"
The text between the quotes will show up in your commit log, and should ideally describe the current state of your code: which changes have you made since the last commit?
Step 3: Pushing your commits to Github
After committing the code, you will have made a snapshot of the current version of the code, on your local system only. If you want to share it with others, the best way is to push it to an online repository (typically Github). Assuming you’ve set up your remotes as defined above, you can use:
gitpushoriginmaster
This will push your code to the origin remote. The master term denotes the current branch you are working on. Branch management is beyond the scope of this tutorial, and you may safely ignore these issues for now.
If you have set up your repository to be private, you will be prompted to enter your Github username and password. After a push is succesfull, you should see your changes on the Github page for your applications, available for everyone (in case it is public) or a selected few (in case it is private).
Note
Authentication with passwords is not supported by Github anymore. Although Github has not changed the prompt message and you will still be asked for your “password”, it is the token that you must provide in that field. Thus, you will need a token. If you are new to tokens, follow this documentation to generate your token. In order to push code to your private repository, it will be enough with a classic personal access token. Make sure to follow those steps in the Git documentation.
Your token will need to have the following assigned scopes:
gist
read:org
repo
workflow
Make sure you select them all in the scope selection step. These scopes can be modified later, so do not panick if you read this too late.